
Page 47 - Tạp chí bonsai cây cảnh BCI 2016Q4
P. 47
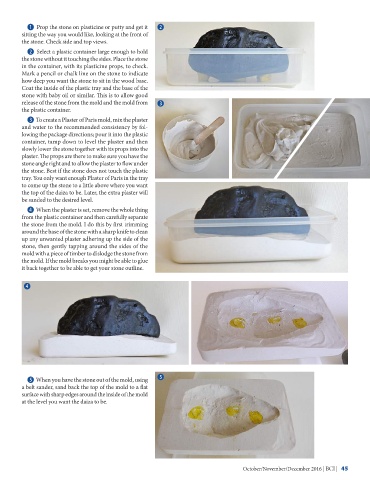
B  Prop the stone on plasticine or putty and get it   C
        sitting the way you would like, looking at the front of
        the stone. Check side and top views.
          C  Select a plastic container large enough to hold
        the stone without it touching the sides. Place the stone
        in the container, with its plasticine props, to check.
        Mark a pencil or chalk line on the stone to indicate
        how deep you want the stone to sit in the wood base.
        Coat the inside of the plastic tray and the base of the
        stone with baby oil or similar. This is to allow good
        release of the stone from the mold and the mold from   D
        the plastic container.
          D  To create a Plaster of Paris mold, mix the plaster
        and water to the recommended consistency by fol-
        lowing the package directions; pour it into the plastic
        container, tamp down to level the plaster and then
        slowly lower the stone together with its props into the
        plaster. The props are there to make sure you have the
        stone angle right and to allow the plaster to flow under
        the stone. Best if the stone does not touch the plastic
        tray. You only want enough Plaster of Paris in the tray
        to come up the stone to a little above where you want
        the top of the daiza to be. Later, the extra plaster will
        be sanded to the desired level.
          E  When the plaster is set, remove the whole thing
        from the plastic container and then carefully separate
        the stone from the mold. I do this by first trimming
        around the base of the stone with a sharp knife to clean
        up any unwanted plaster adhering up the side of the
        stone, then gently tapping around the sides of the
        mold with a piece of timber to dislodge the stone from
        the mold. If the mold breaks you might be able to glue
        it back together to be able to get your stone outline.


         E


          F  When you have the stone out of the mold, using   F
        a belt sander, sand back the top of the mold to a flat
        surface with sharp edges around the inside of the mold
        at the level you want the daiza to be.


                                                                                  October/November/December 2016 | BCI |    45